Starting with Elements 3.4, we have updated the example project to include an advanced packaging scheme which automatically gathers dependencies and builds a zip file containing your Element and it’s dependencies. This greatly simplifies the process required to package an Element. The fundamentals of packaging an Element described in Deploying an Element have not changed. The structure of an Element remains the same with the following directory structure:
libs– a directory containing the jars of the Element’s dependenciesclasspath– a directory containing the classpath of the Element itselfattributes.properties– a file added at deployment time which contains configuration
📝Notes on Structure
All of the above are optional provided there exists one, and only one, package-info annotated with the @ElemmentDefinition annotation (either in jar form or in classpath form)
Manual Migration in Maven #
It may be possible to merge the Example Element to your current project and apply these changes. Before embarking on a rework of your code, see if a merge from our public repository completes without any conflicts.
1. Add Properties to The Build #
Not strictly necessary, but every subsequent step assumes you complete this step. This makes it easy to edit the deployment configuration later.
    <properties>
        <!-- Existing Properties -->
        <element.target.dir>${project.build.directory}/element</element.target.dir>
        <element.distribution.dir>${element.target.dir}/${groupId}.${artifactId}</element.distribution.dir>
        <element.distribution.zip>${element.target.dir}/${project.artifactId}-${project.version}.zip</element.distribution.zip>
    </properties>
2. Use maven-antrun-plugin to Ensure the Element’s Code is Included #
The Maven Antrun Plugin executes Ant tasks which can easily copy the build product into the Element bundle.
            <plugin>
                <groupId>org.apache.maven.plugins</groupId>
                <artifactId>maven-antrun-plugin</artifactId>
                <version>3.1.0</version>
                <executions>
                    <execution>
                        <id>copy-element-build</id>
                        <phase>process-classes</phase>
                        <goals>
                            <goal>run</goal>
                        </goals>
                        <configuration>
                            <target>
                                <copy todir="${element.distribution.dir}/classpath">
                                    <fileset dir="${project.build.directory}/classes" />
                                </copy>
                            </target>
                        </configuration>
                    </execution>
                </executions>
            </plugin>
3. Use the maven-resources-plugin to Copy over Resoruces #
The Maven Resources Plugin ensures that everything in src/main/resoruces gets bundled in the Element.
            <plugin>
                <artifactId>maven-resources-plugin</artifactId>
                <version>3.3.1</version>
                <executions>
                    <execution>
                        <id>copy-element-resources</id>
                        <phase>process-resources</phase>
                        <goals>
                            <goal>copy-resources</goal>
                        </goals>
                        <configuration>
                            <outputDirectory>${element.distribution.dir}/classpath</outputDirectory>
                            <resources>
                                <resource>
                                    <directory>src/main/resources</directory>
                                </resource>
                            </resources>
                        </configuration>
                    </execution>
                </executions>
            </plugin>
4. Use the maven-dependency-plugin To Copy Dependencies Over #
The Maven Dependency Plugin copies all dependencies over to the final output.
📝Notes on Multi-Module Projects
Because the maven-dependency-plugin uses the local repository to find jars, it may be necessary to invoke a manual mvn build install during local development as the jars will only be copied from the local installed repository.
            <plugin>
                <groupId>org.apache.maven.plugins</groupId>
                <artifactId>maven-dependency-plugin</artifactId>
                <version>3.6.0</version>
                <executions>
                    <execution>
                        <id>copy-element-dependencies</id>
                        <phase>process-classes</phase>
                        <goals>
                            <goal>copy-dependencies</goal>
                        </goals>
                        <configuration>
                            <prependGroupId>true</prependGroupId>
                            <excludeScope>provided</excludeScope>
                            <excludeGroupIds>ch.qos.logback,dev.getelements.elements.crossfire</excludeGroupIds>
                            <excludeArtifactIds>sdk-local,sdk-local-maven,sdk-logback</excludeArtifactIds>
                            <outputDirectory>${element.distribution.dir}/lib</outputDirectory>
                        </configuration>
                    </execution>
                </executions>
</plugin>📝Notes on Scope
Artifacts provided by Namazu Elements must be scoped as provided to avoid duplicate entries on the Classpath. All SDK modules should be provided scope. If you experience strange classpath errors, always double-check the provided dependencies.
5. (Optional) Add a Zip Bundle #
To make distributing your Element easier, you can add the following to generate zip of your element bundled with all of its dependencies. The Maven Assembly Plugin can do this.
5.1 Generate assembly.xml #
Create a file called src/assembly/zip.xml within the project and populate it with the assembly definition.
<assembly xmlns="http://maven.apache.org/plugins/maven-assembly-plugin/assembly/1.1.3"
          xmlns:xsi="http://www.w3.org/2001/XMLSchema-instance"
          xsi:schemaLocation="http://maven.apache.org/plugins/maven-assembly-plugin/assembly/1.1.3
                              https://maven.apache.org/xsd/assembly-1.1.3.xsd">

    <id>target-zip</id>

    <formats>
        <format>zip</format>
    </formats>

    <includeBaseDirectory>false</includeBaseDirectory>

    <fileSets>
        <fileSet>
            <directory>${element.distribution.dir}</directory>
            <outputDirectory>/</outputDirectory>
        </fileSet>
    </fileSets>

</assembly>
5.1 Add to pom.xml #
Add the plugin referencing the assembly to the pom.xml
            <plugin>
                <groupId>org.apache.maven.plugins</groupId>
                <artifactId>maven-assembly-plugin</artifactId>
                <version>3.6.0</version>
                <executions>
                    <execution>
                        <id>zip-target-dir</id>
                        <phase>package</phase>
                        <goals>
                            <goal>single</goal>
                        </goals>
                        <configuration>
                            <attach>false</attach>
                            <appendAssemblyId>false</appendAssemblyId>
                            <finalName>${project.artifactId}-${project.version}</finalName>
                            <descriptors>
                                <descriptor>src/assembly/zip.xml</descriptor>
                            </descriptors>
                        </configuration>
                    </execution>
                </executions>
            </plugin>
6. (Optional) Enable Crossfire via Profile #
The existing Namazu Crossfire Guide covers how to enable Namazu Crossfire in the build. We include this section if you wish to use it with the build.
6.1 Add Namazu Crossfire Dependencies #
                <dependency>
                    <groupId>dev.getelements.elements.crossfire</groupId>
                    <artifactId>server</artifactId>
                    <version>${crossfire.version}</version>
                    <scope>provided</scope>
                </dependency>
                <dependency>
                    <groupId>dev.getelements.elements.crossfire</groupId>
                    <artifactId>server</artifactId>
                    <version>${crossfire.version}</version>
                    <classifier>element</classifier>
                    <scope>provided</scope>
</dependency>📝Notes on Scope
As Namazu Crossfire is added separately, we want it to be listed as provided.
6.1 (Optional) Add to local element-lib #
This ensures that local development builds contain Namazu Crossfire. You do not need to perform this step if you do not wish to debug Namazu Crossfire locally in your IDE.
                        <executions>
                            <execution>
                                <id>copy-crossfire-libs</id>
                                <phase>generate-resources</phase>
                                <goals>
                                    <goal>copy-dependencies</goal>
                                </goals>
                                <configuration>
                                    <includeScope>provided</includeScope>
                                    <prependGroupId>true</prependGroupId>
                                    <includeGroupIds>dev.getelements.elements.crossfire</includeGroupIds>
                                    <includeArtifactIds>server</includeArtifactIds>
                                    <excludeClassifiers>element</excludeClassifiers>
                                    <outputDirectory>${project.build.directory}/element-libs</outputDirectory>
                                </configuration>
                            </execution>
                        </executions>
</plugin>📝Notes On Dependencies
This forces Crossfire to share the classpath with your Element, which is likely not the desired behavior. This should not have any consequences unless you share dependencies with Namazu Crossfire itself. We are aware this is a limitation will fix this with better isolation in future builds.
If you do not need to use Namazu Crossfire in your local IDE, then you can omit this step.
6.2 (Optional) Instruct Maven to Fetch Namazu Crossfire Element from Maven Central #
Namazu Crossfire is available on Maven Central as a shaded jar. The shaded jar is qualified with the classifier element indicating that it is an entirely self-contained instance of Crossfire. This code copies it to a directory for easy deployment.
                    <plugin>
                        <groupId>org.apache.maven.plugins</groupId>
                        <artifactId>maven-dependency-plugin</artifactId>
                        <version>3.6.0</version>
                        <executions>
                            <execution>
                                <id>copy-crossfire-element</id>
                                <phase>generate-resources</phase>
                                <goals>
                                    <goal>copy-dependencies</goal>
                                </goals>
                                <configuration>
                                    <includeScope>provided</includeScope>
                                    <prependGroupId>true</prependGroupId>
                                    <includeGroupIds>dev.getelements.elements.crossfire</includeGroupIds>
                                    <includeArtifactIds>server</includeArtifactIds>
                                    <includeClassifiers>element</includeClassifiers>
                                    <outputDirectory>${element.target.dir}/dev.getelements.elements.crossfire.server/lib</outputDirectory>
                                </configuration>
                            </execution>
                        </executions>
                    </plugin>
7. Verify Deployment #
Now that you have all of the sections added to your Maven pom.xml you can easily perform a build to ensure that Maven makes a neatly packaged release for you. The simple method to include this is to run Maven from the comand line:
mvn clean package7.1 Verify Bundle and Zip was Correctly Made #
Within your IDE you shoudl see the following in the target directory. You can also verify this by simply inspecting the directory using your OS’s file browser.
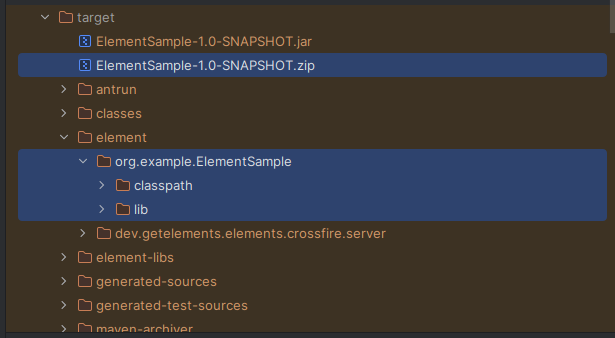
7.2 Verify Zip File Created Properly #
Use the zip tool to ensure that the element has everything in the right place.
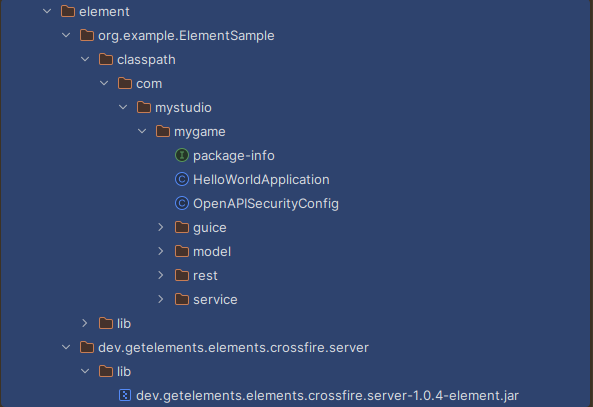
unzip -l target/ElementSample-1.0-SNAPSHOT.zipThis should show something similar to the following output:
Archive:  target/ElementSample-1.0-SNAPSHOT.zip
  Length      Date    Time    Name
---------  ---------- -----   ----
        0  2025-11-04 14:26   lib/
        0  2025-11-04 14:26   classpath/
        0  2025-11-04 14:26   classpath/com/
        0  2025-11-04 14:26   classpath/com/mystudio/
        0  2025-11-04 14:26   classpath/com/mystudio/mygame/
        0  2025-11-04 14:26   classpath/com/mystudio/mygame/rest/
        0  2025-11-04 14:26   classpath/com/mystudio/mygame/service/
        0  2025-11-04 14:26   classpath/com/mystudio/mygame/model/
        0  2025-11-04 14:26   classpath/com/mystudio/mygame/guice/
    16138  2025-10-26 19:28   lib/dev.getelements.elements.sdk-spi-guice-3.4.12.jar
    10681  2021-10-16 11:56   lib/jakarta.inject.jakarta.inject-api-2.0.1.jar
  2974216  2021-09-27 12:19   lib/com.google.guava.guava-31.0.1-jre.jar
   794714  2023-12-24 08:32   lib/org.javassist.javassist-3.30.2-GA.jar
   801785  2023-05-12 10:41   lib/com.google.inject.guice-7.0.0.jar
     4617  2018-11-19 09:57   lib/com.google.guava.failureaccess-1.0.1.jar
   334352  2023-08-27 01:26   lib/org.yaml.snakeyaml-2.2.jar
    17364  2024-03-09 12:06   lib/com.fasterxml.jackson.jakarta.rs.jackson-jakarta-rs-json-provider-2.16.2.jar
    54824  2025-10-26 19:28   lib/dev.getelements.elements.sdk-spi-3.4.12.jar
    14835  2021-05-14 16:04   lib/com.google.errorprone.error_prone_annotations-2.7.1.jar
    95629  2024-05-15 02:42   lib/io.swagger.core.v3.swagger-jaxrs2-jakarta-2.2.22.jar
    16205  2025-10-26 19:28   lib/dev.getelements.elements.sdk-guice-3.4.12.jar
   574448  2024-08-20 00:01   lib/io.github.classgraph.classgraph-4.8.175.jar
    19936  2017-03-30 21:55   lib/com.google.code.findbugs.jsr305-3.0.2.jar
    41513  2021-07-20 04:56   lib/org.slf4j.slf4j-api-1.7.32.jar
     2199  2018-09-11 12:40   lib/com.google.guava.listenablefuture-9999.0-empty-to-avoid-conflict-with-guava.jar
     8781  2017-01-18 15:09   lib/com.google.j2objc.j2objc-annotations-1.3.jar
     4467  2005-08-01 02:23   lib/aopalliance.aopalliance-1.0.jar
   208835  2021-04-01 11:48   lib/org.checkerframework.checker-qual-3.12.0.jar
    32408  2024-03-09 11:09   lib/com.fasterxml.jackson.module.jackson-module-jakarta-xmlbind-annotations-2.16.2.jar
   136369  2024-05-15 02:42   lib/io.swagger.core.v3.swagger-models-jakarta-2.2.22.jar
   582784  2024-03-09 10:43   lib/com.fasterxml.jackson.core.jackson-core-2.16.2.jar
    32475  2024-03-09 12:05   lib/com.fasterxml.jackson.jakarta.rs.jackson-jakarta-rs-base-2.16.2.jar
     1414  2025-11-04 14:26   classpath/com/mystudio/mygame/OpenAPISecurityConfig.class
      791  2025-11-04 14:26   classpath/com/mystudio/mygame/rest/HelloWorld.class
     1766  2025-11-04 14:26   classpath/com/mystudio/mygame/rest/HelloWithAuthentication.class
     2523  2025-11-04 14:26   classpath/com/mystudio/mygame/rest/ExampleContent.class
      289  2025-11-04 14:26   classpath/com/mystudio/mygame/service/GreetingService.class
     2138  2025-11-04 14:26   classpath/com/mystudio/mygame/service/GreetingServiceImpl.class
     2110  2025-11-04 14:26   classpath/com/mystudio/mygame/HelloWorldApplication.class
     1263  2025-11-04 14:26   classpath/com/mystudio/mygame/model/ExamplePostRequest.class
     1825  2025-11-04 14:26   classpath/com/mystudio/mygame/model/ExamplePutResponse.class
     1829  2025-11-04 14:26   classpath/com/mystudio/mygame/model/ExamplePostResponse.class
     1259  2025-11-04 14:26   classpath/com/mystudio/mygame/model/ExamplePutRequest.class
      612  2025-11-04 14:26   classpath/com/mystudio/mygame/package-info.class
      846  2025-11-04 14:26   classpath/com/mystudio/mygame/guice/MyGameModule.class
---------                     -------
6798240 45 files📝What to Look For
- The only Namazu Elements’ SDK entries are SPI related.
- Third party dependencies (eg guice) are included automatically along with their dependencies.
- Test classes are excluded and only the production code appears in
classpath - The Jars are fully-qualified with group and artifact id