

 Doc Summary

This walks through configuring Twitch as an OIDC provider for the browser-redirect login
flow (see OIDC Login for Thick Clients (Browser Redirect Flow for the client-side sequence). It covers registering the app with Twitch and creating the OidcProviderConfiguration on the Elements server.
This is Distinct from the older, direct id_token validation path (OidcAuthScheme, seeded
by DefaultOidcSchemeConfiguration) which just validates a JWT you already possess.
This one drives the full authorization-code flow: opening Twitch’s login page, handling the
redirect, and exchanging the code for tokens.
Step 1: Determine your Elements callback URL #
Before registering anything with Twitch, figure out the exact URL Elements will use as the
OAuth redirect target. It’s always:
{API_OUTSIDE_URL}/OIDC/twitch/callbackAPI_OUTSIDE_URL is this server’s configured public base URL (the dev.getelements.elements.api.url
named config value; defaults to http://localhost:8080/api/REST if unset). For a default
local dev setup, the callback URL is:
http://localhost:8080/api/REST/OIDC/twitch/callbackThis must match what you register with Twitch byte-for-byte including scheme, host, port, path,
and trailing slash all count. Twitch rejects any mismatch with error=redirect_mismatch, otherwise.
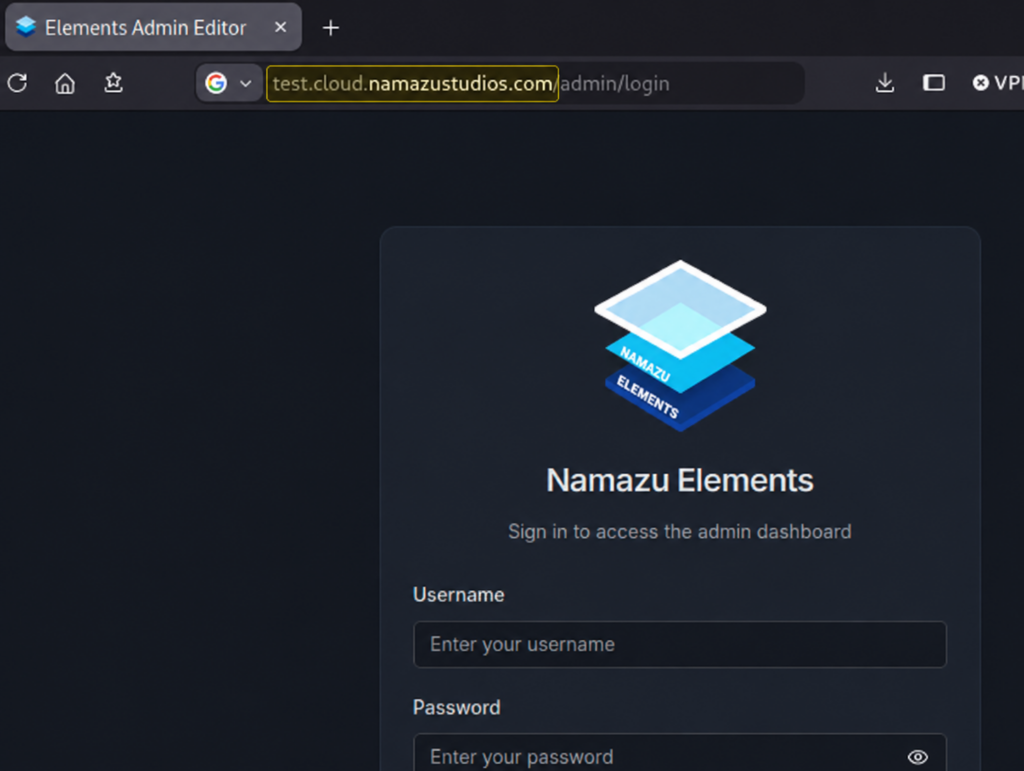
Alternatively, you can always find the URL base by looking at the host part in the admin URL for your instance of Namazu Elements.
Step 2: Register an app in the Twitch Developer Console #
- Go to the Twitch Developer Console and create a new
Application. - Under OAuth Redirect URLs, add the exact callback URL from Step 1.
- Specify Category that best relates to your particular project or game.
- Select Client Type as Confidential.
- Select Organization as it applies to your particular project or game.
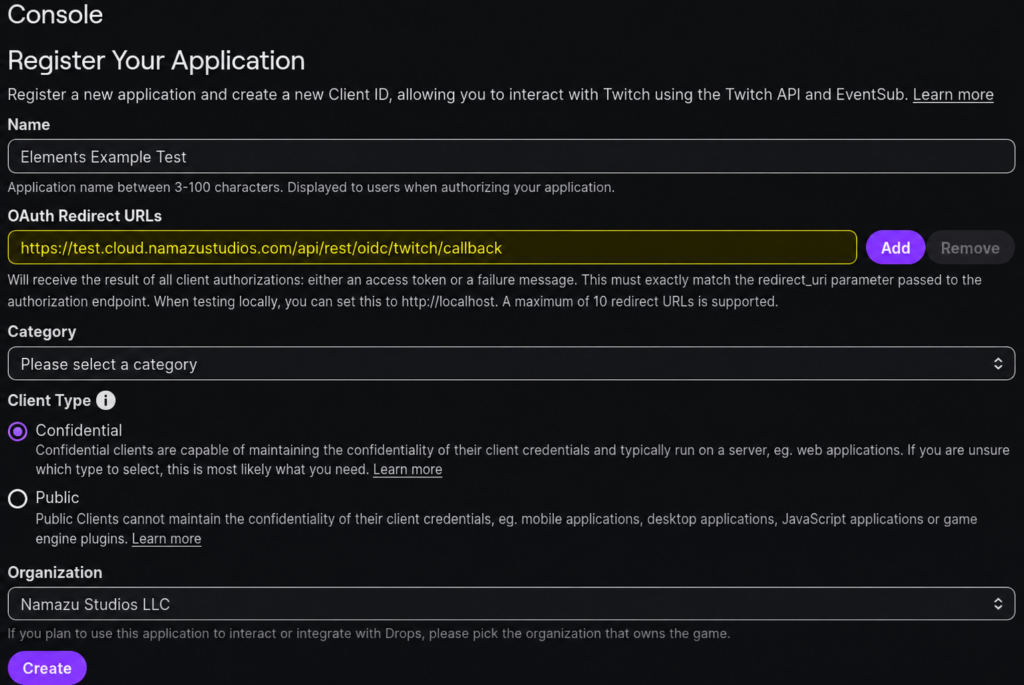
At this point, Twitch will direct you back to the listing of all Applications you’ve created.
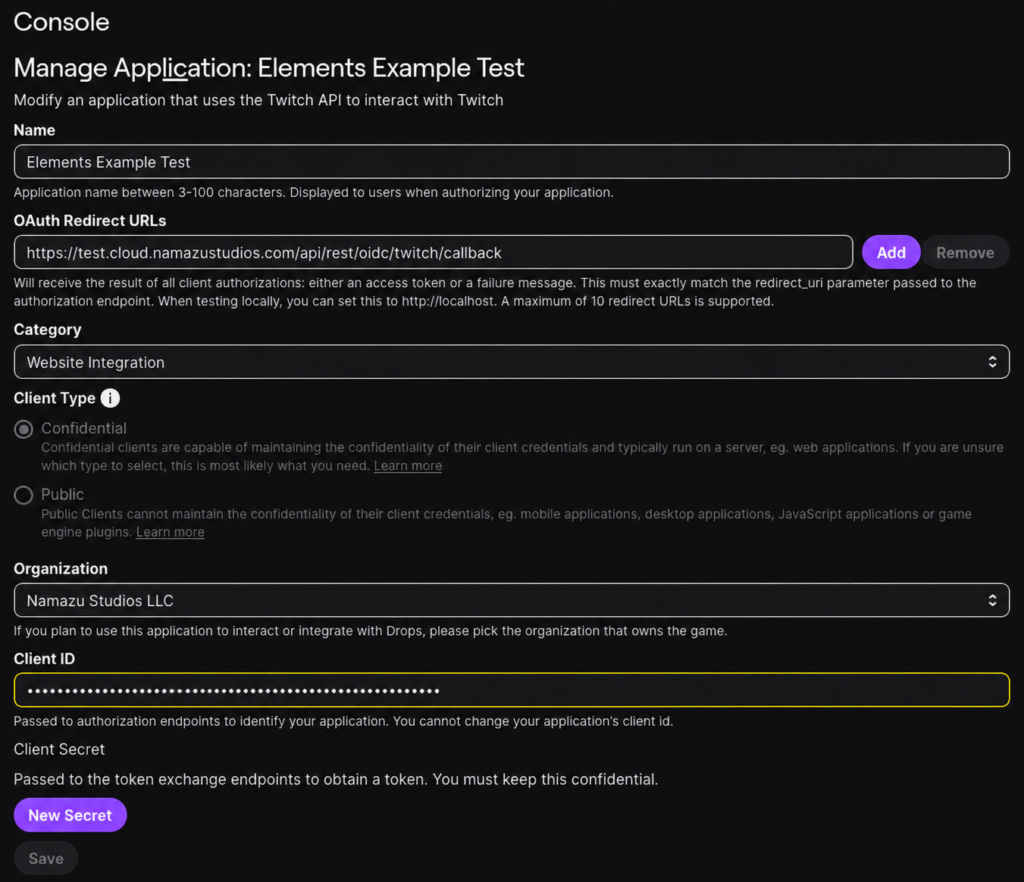
- Click the Manage button on the Application you just created.
- If there is no secret yet, then click “New Secret”
- Note: Regenerating an old secret will cause existing applications to immediately cease to function. This may cause downtime on an existin Application.
Step 3: Create the provider configuration in Elements #
This requires a SUPERUSER Session in the admin console.
- In the left sidebar, open the Auth category and select OIDC Providers.
- Click + Create OIDC Provider to open the creation dialog.
- Fill in the fields:
- name:
twitchthis becomes part of the callback URL (/OIDC/twitch/callback) and
the key used forUser.linkedAccountProfiles. - name:
twitchthis becomes part of the callback URL (/OIDC/twitch/callback) and
the key used forUser.linkedAccountProfiles. - discoveryUrl:
https://id.twitch.tv/OAuth2/.well-known/openid-configuration - clientId: your Twitch Client id
- clientSecret: your Twitch Client Secret. This field is never pre-filled; the API
never echoes a saved secret back, so it always shows blank if you reopen this
configuration to edit it later. Leave it blank on an edit to keep the existing secret. - scopes: a tag input. Type
openid, press Space or Enter, then typeUser:read:emailand press Space or Enter. Both scopes are required; see below. - redirectUri: leave Use built-in Elements redirect checked so Elements
auto-computes the callback URL from Step 1. Only uncheck it and enter a URL manually if
you registered a different callback URL with Twitch; if you do, it must match that
registered value byte-for-byte, same rule as above. - extraAuthorizeParams: a raw JSON textarea. Paste:
json { "claims": "{\"id_token\":{\"email\":null,\"email_verified\":null,\"preferred_username\":null}}" } - tokenEndpointAuthMethod: select Client Secret Post from the dropdown. Do not
leave this at the default Client Secret Basic — see below. - successRedirectUrl / errorRedirectUrl: optional, only needed for the
browser-redirect thick-client flow.
- name:
- Save. Elements resolves Twitch’s discovery document immediately and auto-provisions the matching
OidcAuthSchemeby issuer no separate manual step needed.
Field values that matter more than they look like they should #
scopesmust include"openid". Twitch’s token endpoint only returns anid_tokenif
the authorization request included theopenidscope. Without it, you’ll get a200from
the token exchange but noid_tokenin the response, which Elements reports asToken endpoint response did not contain an id_token.tokenEndpointAuthMethodmust beCLIENT_SECRET_POST. This field defaults toCLIENT_SECRET_BASIC(HTTP Basic auth) if omitted, which is legal per RFC 6749 — but
Twitch’s token endpoint doesn’t read credentials from theAuthorizationheader at all. If
left at the default, token exchange fails with{"status":400,"message":"missing client secret"}(ormissing client id) even though the credentials were sent, just in the wrong
place as far as Twitch is concerned.- Getting
emailrequires two separate things, not one. TheUser:read:emailscope is a
prerequisite per Twitch’s docs, but it is not sufficient by itself — Twitch’s id_token only
ever carries a minimal default claim set (aud,azp,exp,iat,iss,sub) unless you
also request extra claims via the non-standardclaimsauthorize parameter, set throughextraAuthorizeParamsas shown above. Skip either one andemailsimply won’t be in the
id_token, and Elements will have nothing to link. Elements trusts anyemailclaim returned
by a configured provider as already verified — it does not checkemail_verifiedat all
(some providers omit that claim, or encode it as a non-boolean type). The example above still
requestsemail_verifiedfor completeness, but it’s informational only; Elements ignores it.
Profile claims: what gets linked onto the User record #
Beyond sub (linked as a UserUid) and email (linked as a UserUid + copied to User.email),
Elements also captures standard OIDC Profile-scope claims — given_name, family_name,preferred_username, and others — whenever a provider returns them:
- On a new anonymous login (
AnonOidcAuthService, the flow this doc walks through), any ofpreferred_username→User.preferredUsername,given_name→User.firstName, andfamily_name→User.lastNamethat are present get set on the new User directly. On a
returning User, the same claims only fill in a field if it’s currently blank — an existing
value (set by an admin, the User, or an earlier login) is never overwritten. - Every provider’s full set of returned Profile claims is also snapshotted, as-is, into
User.linkedAccountProfiles, keyed by the OIDC scheme’sname— this is a per-provider audit
trail (visible in the admin console as a breakout view on the User record), not subject to the
fill-only-if-blank rule above, and is captured on both new and returning logins, and when
linking an additional scheme to an already-authenticated User (UserOidcAuthService) — though
that linking path does not touch the flatpreferredUsername/firstName/lastNamefields,
onlylinkedAccountProfiles.
For Twitch specifically: request preferred_username via the claims extra authorize parameter
as shown in Step 3 to get it linked. Twitch has no “real name” concept in its public API/OIDC
surface (only username/display name), so given_name/family_name/name will never be present
regardless of configuration. Profile.displayName is unrelated to all of this — it’s always a
randomly generated name unless set explicitly via the Profile API.
Step 4: Verify in the admin console #
The OIDC Providers resource in the admin console (under the Auth category) shows the
saved configuration. clientSecret is write-only — it’s never echoed back by the API, so the
console always shows it blank on edit; leave it blank when editing to keep the existing
secret, or type a new one to rotate it.
Step 5: Test the login #
Using the thick-client sequence (see OIDC Login for Thick Clients for full detail):
curl -X POST http://localhost:8080/api/REST/OIDC/Session \
  -H 'Content-Type: Application/json' \
  -d '{"provider": "twitch"}'
Open the returned authorizeUrl in a browser, complete the Twitch login, then poll:
curl http://localhost:8080/api/REST/OIDC/Session/{handle}until status is COMPLETE (with the Session) or FAILED. Two things to know about polling:COMPLETE is only returned once, on the poll that first observes it — a second poll for the same
handle returns HTTP 404, not another COMPLETE body. An unknown or expired handle also returns404 rather than a body with status: EXPIRED, so a 404 on its own doesn’t necessarily mean the
login failed; check whether you’d already consumed a COMPLETE response before treating it as one.
Troubleshooting #
| Symptom | Cause | Fix |
|---|---|---|
Browser lands on ...?error=redirect_mismatch | The redirect_uri Elements sent doesn’t exactly match what’s registered in Twitch’s console | Compare the exact redirectUri on the provider config against Twitch’s registered OAuth Redirect URL; they must match byte-for-byte |
Token exchange fails: {"status":400,"message":"missing client id"} or "missing client secret" | tokenEndpointAuthMethod is CLIENT_SECRET_BASIC (the default); Twitch ignores the Authorization header | Set tokenEndpointAuthMethod to CLIENT_SECRET_POST on the provider config |
ForbiddenException: Token endpoint response did not contain an id_token | scopes doesn’t include openid | Add "openid" to the provider config’s scopes |
Token exchange failed with status 400 with no other detail returned to the caller | Expected — the actual provider error is intentionally not exposed to the API caller | Check the server logs; the token endpoint’s error body is logged at error level (OidcLoginAttemptOperations.exchangeCodeForIdToken) |
Logged in, but no email UserUid and User.email is empty | email missing from the id_token — either User:read:email scope is missing or the claims extra authorize param isn’t set (email_verified is not required; Elements doesn’t check it) | Add User:read:email to scopes and set extraAuthorizeParams.claims as shown above |
Logged in, but User.preferredUsername wasn’t set | preferred_username missing from the id_token, the User already had a preferredUsername set (fill-only-if-blank, never overwritten), or you’re testing the link-account flow rather than login (that path only writes linkedAccountProfiles, not the flat field) | Confirm extraAuthorizeParams.claims requests preferred_username under id_token; check User.linkedAccountProfiles["twitch"] to see exactly what the token returned |